Bitbucket with Pipelines and automated tests
Setting up your project with automated tests and deployments is so valuable that I consider it to be one of the fundamentals of a successful project! It increases developer productivity and decreases bug counts drastically.
If you are using Bitbucket to host your project code, you can take advantage of their Pipelines offering to setup these automated tasks easily and effectively.
This blog post assumes you are managing a NodeJS project, but the instructions here will probably apply to similar projects. If you’d like help setting up automated tests for your project, reach out and I’ll see if I can help guide you!
I’ve setup a fully configured repository in Bitbucket that you can go look at, and the rest of this blog post will be an explanation of that repository.
Other posts in this series:
Code setup #
The first thing to note is that I’ve set up unit tests and linting to run as npm run scripts. That means the version of tape and eslint (used for unit testing and linting) that run in Pipelines will be the same version specified in the package.json file, eliminating version difference errors.
Running tests for this project is as easy as:
npm run lint
npm run test
If you clone the demo repo and play with it locally, you can try modifying the index.js file and running the unit and linting tests, to see what those look like when they break.
Pipelines setup #
The basic setup for Bitbucket Pipelines requires a file named bitbucket-pipelines.yml placed at the root of the repository. It contains the configuration details to get Pipelines working.
At the simplest, the YAML file needs to specify an image and a default pipeline. For example:
image: node:8.11
pipelines:
  default:
    - step:
        script:
          - npm run lint
          - npm run test
The image is essentially the Docker image to execute the Pipeline steps in. For a normal JavaScript project, you’ll specify the image as node:$VERSION, where $VERSION is whatever the most recent version of NodeJS your project supports. In this example, I’m supporting NodeJS 8.11, and my tests will execute in that environment.
The pipelines is an object which can basically only have default and branches as properties. Those two will contain the steps to run as part of the Pipelines process.
If you have a default property, all pull requests and merges will execute those steps if no other branch Pipeline is specified.
The list items inside script are each steps that execute. If any of those commands exit with an error, the whole Pipelines process will stop.
A more complete setup #
The following scenario is common for most workplaces:
- When any pull requests happen, run tests.
- When pull requests to the
developbranch are merged, deploy the QA server. - When pull requests to the
masterbranch are merged, deploy the production server.
With those requirements, you might have a Pipelines YAML file like this:
image: node:8.11
pipelines:
  default:
    - step:
        script:
          - npm run test
  branches:
    master:
      - step:
          deployment: production
          script:
            - npm run test
            - ./deploy.sh production
    develop:
      - step:
          deployment: staging
          script:
            - npm run test
            - ./deploy.sh qa
The default pipeline shows that tests will be run for every pull request.
The branches object shows that there are two branches being watched, the master and develop branches. The deployment property is used by Bitbucket to tag those steps as production or staging.
Finally, the ./deploy.sh step is for a theoretical deployment bash script which would push your code to your server.
How it works #
Suppose a developer makes a pull request with some changes. The change they propose is correct for the business, but it has unintended consequences–it breaks other code that relied on the old behavior.
Failing tests in this case are good! One of the primary benefits of writing tests is documenting business logic, and in this case we want to know if a change in one part of our code will affect other parts.
When your project is set up to run tests on all pull requests, you have immediate feedback that your proposed changes have these unintended consequences: the automated tests fail!
I’ve made an example pull request to the demo project, showing what happens when you make a pull request with failing tests:
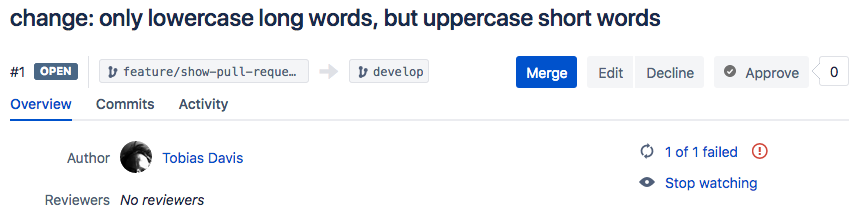
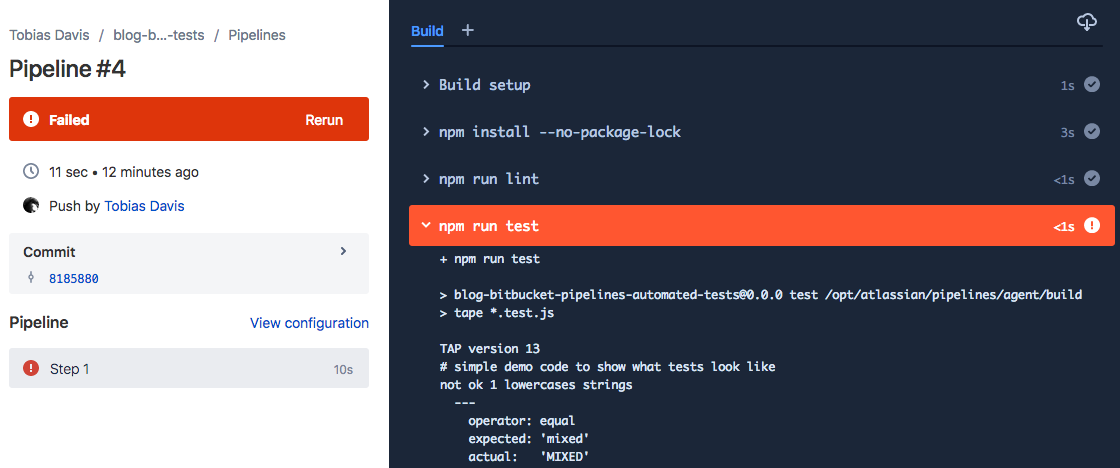
The part to note is the text 1 of 1 failed, which is the results from Pipeline. The text is a link to the actual console output, which (in this example) looks like this:
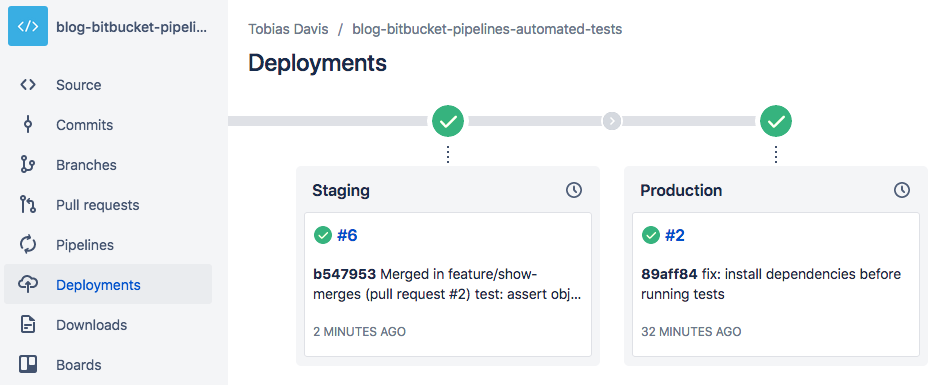
Next, here’s a pull request where all tests pass. Since all tests passed, I merged the pull request.
When a merge happens to a branch in the bitbucket-pipelines.yml file, it executes those steps. If you navigate to the “Deployments” view, you can see that the Pipelines process completed:
In the example YAML file above, I showed a step that looked like ./deploy.sh qa which I said could deploy your actual server. In future articles I’ll show you how to use this setup to deploy to AWS using a serverless stack.
For now, I’ll just show you a teaser of what that deploy.sh file might look like:
# deploy to AWS using serverless.com setup
serverless deploy --stage $1 --profile my-project
# ping the Slack channel when complete
curl -X POST \
  --data-urlencode 'payload={"username": "deploy", "text": "deploy '"$1"'"}' \
	https://hooks.slack.com/services/... # your secret
Now you’ve got a project that runs automated unit tests and linting on every pull request, deploys automatically on merge, and pings your Slack channel when the deploy is complete!
In the next post, I talk about using advanced features of Bitbucket Pipelines.