Advanced features in Bitbucket Pipelines
If you’re using Bitbucket Pipelines, you’ll probably want to use some of the advanced features. In this post I’ll show you two of them: secured environment variables, and private repository access.
Previously, I showed how to set up Pipelines to run automated tests. In this blog post I’ve created a new demo repository to show these advanced features.
If you run into trouble getting these features set up for your project, you can reach out and I’ll see if I can help guide you!
Other posts in this series:
Secured environment variables #
In the Pipelines environment there are essentially three types of environment variables:
1: Unsecure, set by you as part of the bitbucket-pipelines.yml configuration. #
For example, in this YAML file the environment variable STAGE is saved to your repository without encryption, so it is not secure:
image: node:8.11
pipelines:
  default:
    - step:
        script:
          - export STAGE=qa
          - node index.js
In this example, the first script line will show up in the Pipelines output, fully visible. However, if your tests or other code reference environment variables set in the YAML file, you may accidentally leak these to the logs as well.
These properties are well suited to things like staging names, server domains, and other similarly public or pseudo-public values.
2: Unsecure, set in the Bitbucket configuration. #
In your Bitbucket repository settings, under “Pipelines”, you can configure environment variables which will be available within the Pipelines environment.
By default these will also be shown in the Pipelines log output, so they should be used for public or pseudo-public values that you simply may not want to include in your repository.
3: Secure, set in the Bitbucket configuration. #
In the same repository settings section, when you add an environment variable you can mark it as “secured” (using the padlock icon):
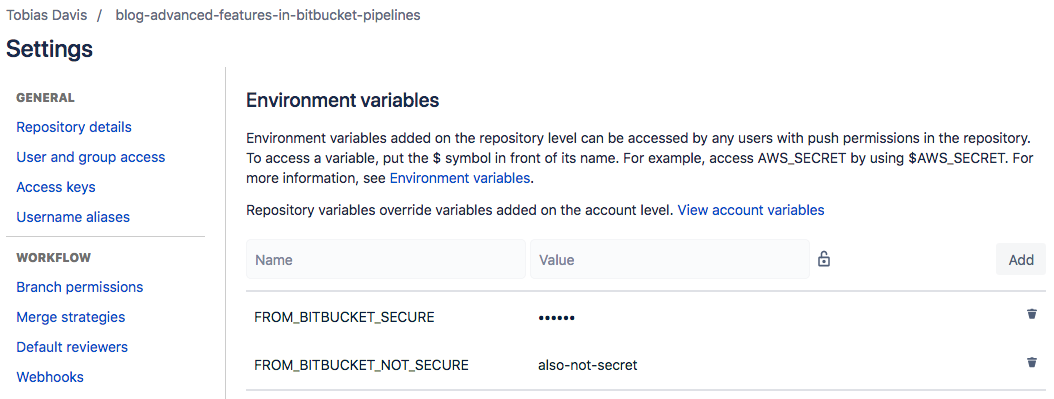
Secured variables have a unique property: they are removed from the Pipelines logging output. This means that, if your code accidentally logs out your secret keys, they won’t show up in the Pipelines log.
For example, the demo repository logs out the three different environment variables:
console.log('Set in the YAML file, not secured:', process.env.FROM_YAML_NOT_SECURE)
console.log('Set in Bitbucket configuration, not secured:', process.env.FROM_BITBUCKET_NOT_SECURE)
console.log('Set in Bitbucket configuration, secured:', process.env.FROM_BITBUCKET_SECURE)

if (process.env.FROM_BITBUCKET_SECURE === 'my-secure-string') {
	console.log('The environment variable is set.')
}
console.log('When it is used as a string: my-secure-string')
And the output in Pipelines looks like this:

These secure environment variables are where you should put things like your AWS credentials used to automate deployments.
Access private repository #
Depending on your architecture, your repository may need to access another internal and private repository. Unfortunately there is not simple builtin Bitbucket solution, but it’s possible to make it work.
I’ve created a private repository which contains an npm module that looks like this:
{
  "name": "private-blog-demo",
  "main": "index.js",
  "repository": {
    "type": "git",
    "url": "git+https://[email protected]/saibotsivad/private-blog-demo.git"
  }
}module.exports = input => input.toLowerCase()In the demo repository that you can see, I want to add this private repository as a dependency:
npm install --save git+ssh://[email protected]/saibotsivad/private-blog-demo.git#dde3b69b6e92421014435e034d74589e3ba12841And I’ll use it in the code like this:
const lower = require('private-blog-demo')
console.log(lower('THIS TEXT WILL BE LOWER CASE'))
However, you’ll see that the Pipelines execution failed because the demo repository does not have access to the private repository:

The solution is a little complicated, but the concept is simple: create an SSH key that you store as a secured environment variable, authorize that key in the private repository, and add it to the Pipelines environment on execution.
1: Create SSH key #
Bitbucket has a pretty good tutorial on creating an SSH key, but on a Mac it’s as simple as:
ssh-keygenWhen prompted, do not use a passphrase for this key. Since we’re only going to use this key in Bitbucket, place it somewhere where you’ll remember to delete it when finished.
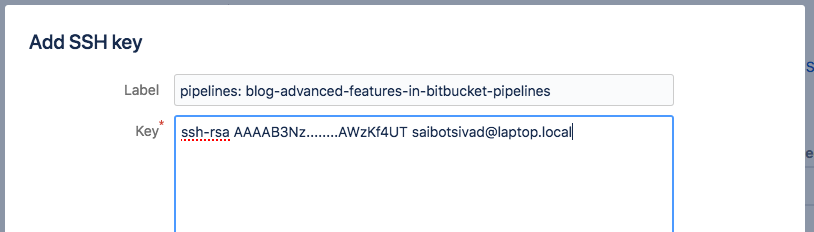
2: Add to private repository #
Take the public key text (the file ending in .pub), go to your private repository settings, under “General” and “Access Keys”, add that key. Be sure to label the key specifically:
3: Add to main repository #
In this step you’ll be setting the private key text as an environment variable in the main repository, that way it has access to the private repository.
Since the private key is very long and has multiple lines, we want to turn it into a single-line string to avoid environmental differences. On the Mac (and in Pipelines) we have access to the command base64, so we can encode the private key like this:
cat temporary_key_rsa | base64Take this long string and set it in your main repository settings as a Pipeline environment variable, being sure to make the property secure. I’ve named mine BITBUCKET_SSH_KEY
Next, you’ll want to make sure you’ve done a git clone of the private repository at least once, because we’ll be grabbing the Bitbucket host key from ~/.ssh/known_hosts.
Inside that file you’ll see a handful of really long lines that look like this:
bitbucket.org,18.205.93.1 ssh-rsa AAAA...BBB=
Take the one line for bitbucket.org, and base64 encode it:
echo "bitbucket.org,18.205.93.1 ssh-rsa AAAA...BBB=" | base64Take that long encoded output string and save it as another Pipeline environment variable, making it secure as well. I’ve named mine BITBUCKET_KNOWN_HOSTS.
4: Using the SSH key in Pipelines #
In the last step, we need to add the SSH key and known hosts to the Pipeline environment when it executes. This is done in three ordered steps:
1: Ensure that the SSH folder is present.
mkdir -p ~/.ssh2: Create the known hosts file with the environment variable:
(umask 077 ; echo $BITBUCKET_KNOWN_HOSTS | base64 --decode > ~/.ssh/known_hosts)3: Create the private key from the environment variable:
(umask 077 ; echo $BITBUCKET_SSH_KEY | base64 --decode > ~/.ssh/id_rsa)All together in the bitbucket-pipelines.yaml file, that looks like this:
image: node:8.11
pipelines:
  default:
    - step:
        script:
          - mkdir -p ~/.ssh
          - (umask 077 ; echo $BITBUCKET_KNOWN_HOSTS | base64 --decode > ~/.ssh/known_hosts)
          - (umask 077 ; echo $BITBUCKET_SSH_KEY | base64 --decode > ~/.ssh/id_rsa)
          - npm install --no-package-lock
Finally, it all comes together (you can see the lowercased text, which is the output of the private repository code):
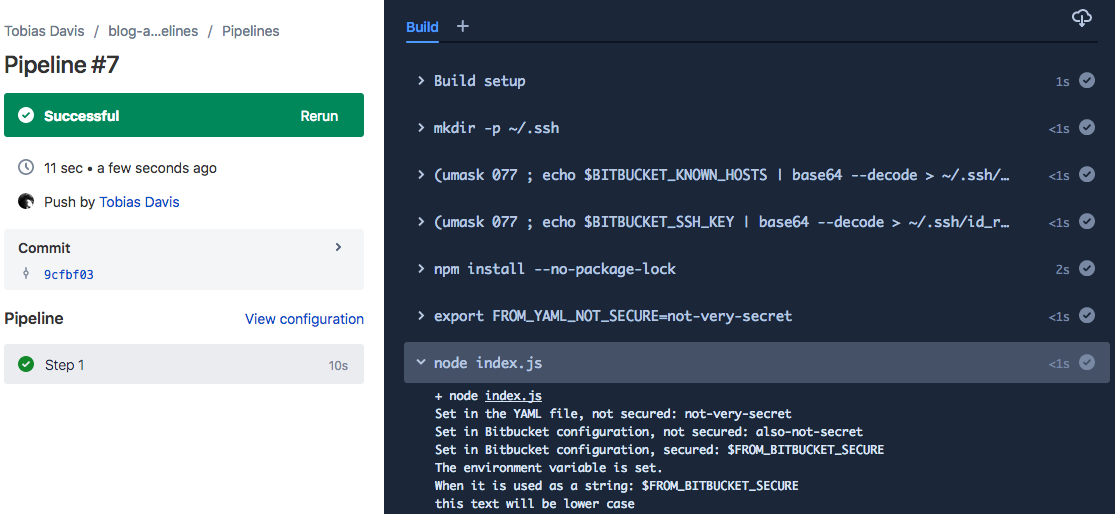
Now you have a repository that has access to a different, private repository!